PhotoRobot Ghidul utilizatorului pentru studioul de covoare
Acest ghid de utilizare detaliază PhotoRobot Carpet Studio cu Carousel 3000. Acesta oferă informații detaliate și instrucțiuni pentru instalarea funcțională și operarea Carpet Studio de către client. Există prezentări generale ale robotului Carousel 3000, software-ului PhotoRobot Controls App, poziționării camerei, operării și etichetelor de informații.
Important: Consultați întotdeauna Informații și instrucțiuni de siguranță PhotoRobot împreună cu orice documentație furnizată specific pentru dispozitivul dumneavoastră. În plus, instalarea inițială a PhotoRobot Carpet Studio și a oricărui dispozitiv PhotoRobot în general trebuie efectuată de o autoritate PhotoRobot autorizată. Acestea includ un distribuitor aprobat sau un reprezentant al producătorului însuși.
Notă: Pentru mai multe informații specifice despre robotul Carousel 3000, consultați Ghidul de utilizare PhotoRobot Carousel.
Bun venit la PhotoRobot Carpet Studio
Vă mulțumim pentru achiziționarea PhotoRobot Carpet Studio și felicitări! PhotoRobot aduce decenii de experiență profesională, înțelegere și inovație în fotografia automatizată. Atât elegant, cât și ingenios, fiecare produs se mândrește cu un design care prioritizează clientul și productivitatea maximă a studioului foto. Aceasta înseamnă că vă puteți aștepta întotdeauna la cele mai înalte niveluri de precizie, viteză și standardizare foto la fiecare utilizare – în fiecare dintre fluxurile dumneavoastră de lucru. Bun venit la PhotoRobot Carpet Studio.
1. Descrierea Produsului - PhotoRobot Carpet Studio
Studio-ul de covoare PhotoRobot integrează Carousel 3000 ca o platformă de fotografie ROBOTICă cu comenzi software prin aplicația PhotoRobot Controls (în continuare „CAPP”). Platforma ROBOTICă a Carousel 3000 este potrivită pentru orientarea SPIN a obiectelor fotografiate, în timp ce platforma rotativă are un diametru de 3 metri. Între timp, motorul este separat de platforma de fotografie, garantând un nivel scăzut al podelei.
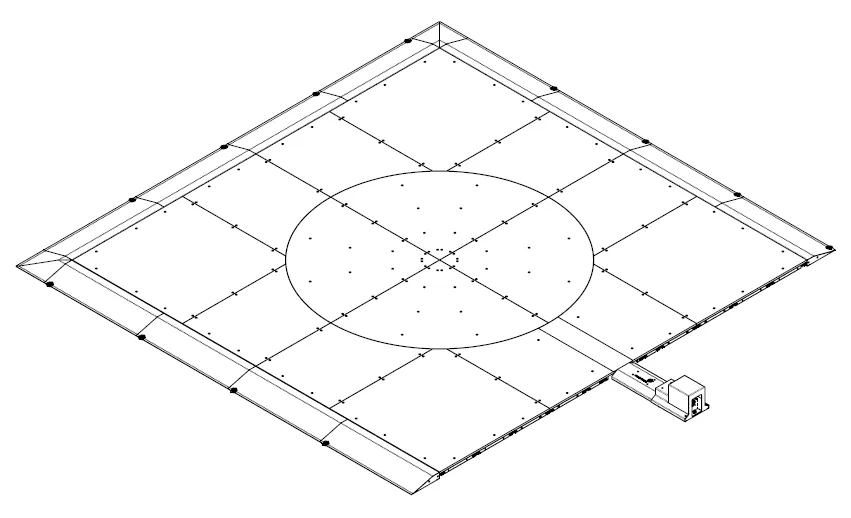
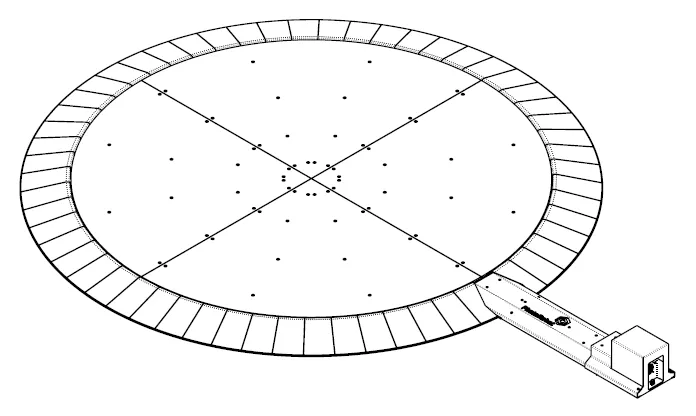
1.1. Prezentare generală a mașinii - CAROUSEL 3000
Partea principală a Carpet Studio este mașina PhotoRobot CAROUSEL 3000 în modificarea de formă pătrată cu rampe de acces pe părțile din față, stânga și dreapta.
1.2. Componente principale ale mașinii Carousel 3000
Principalele componente ale CAROUSEL 3000 sunt în următoarele infografice, etichetând părțile 1 - 7.
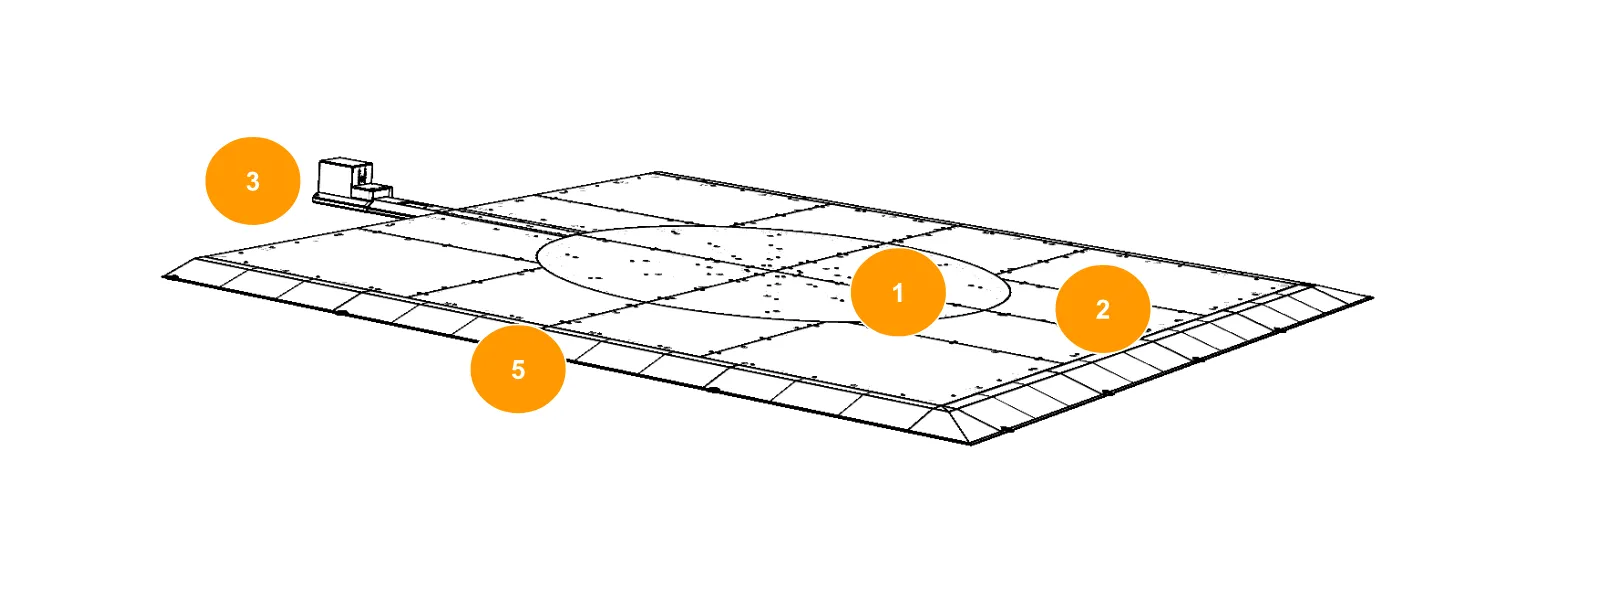
- Platformă rotativă (1)
- Podea cu placă (2)
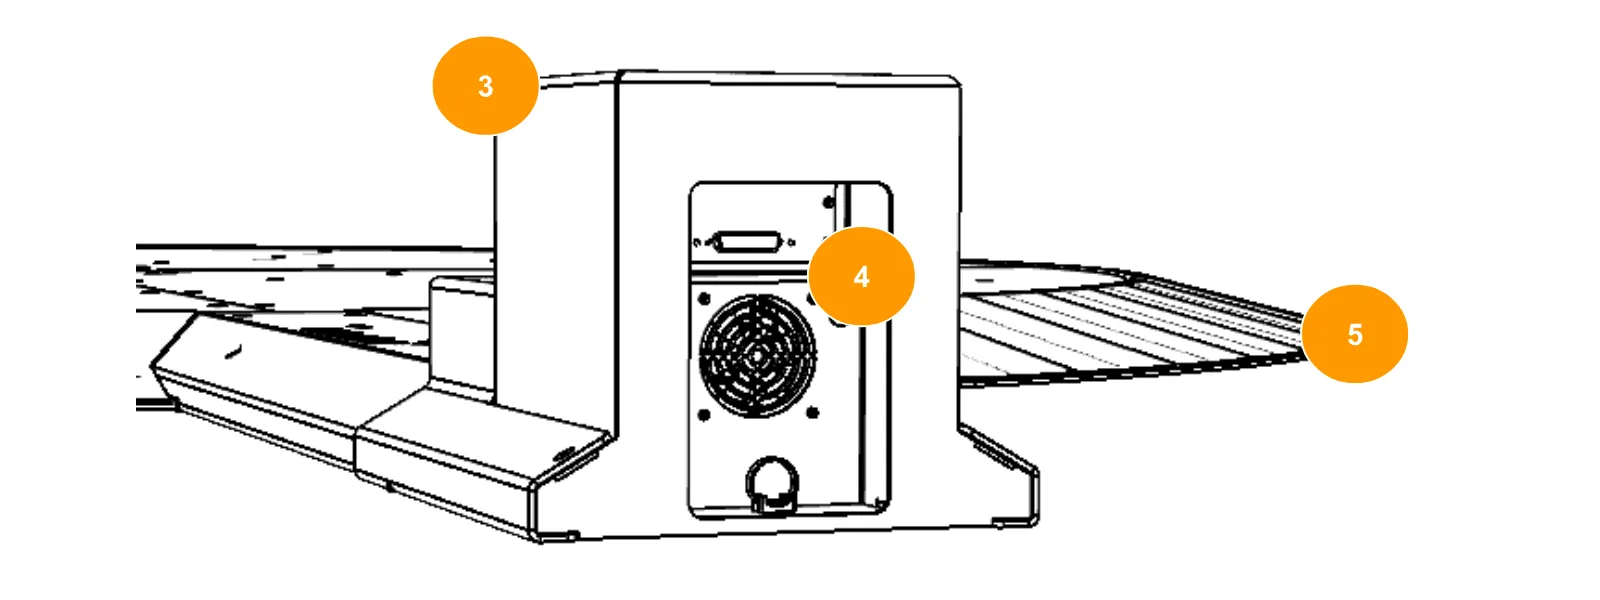
- Ansamblul motorului (3)
- Conectori pentru mașini dom (4)
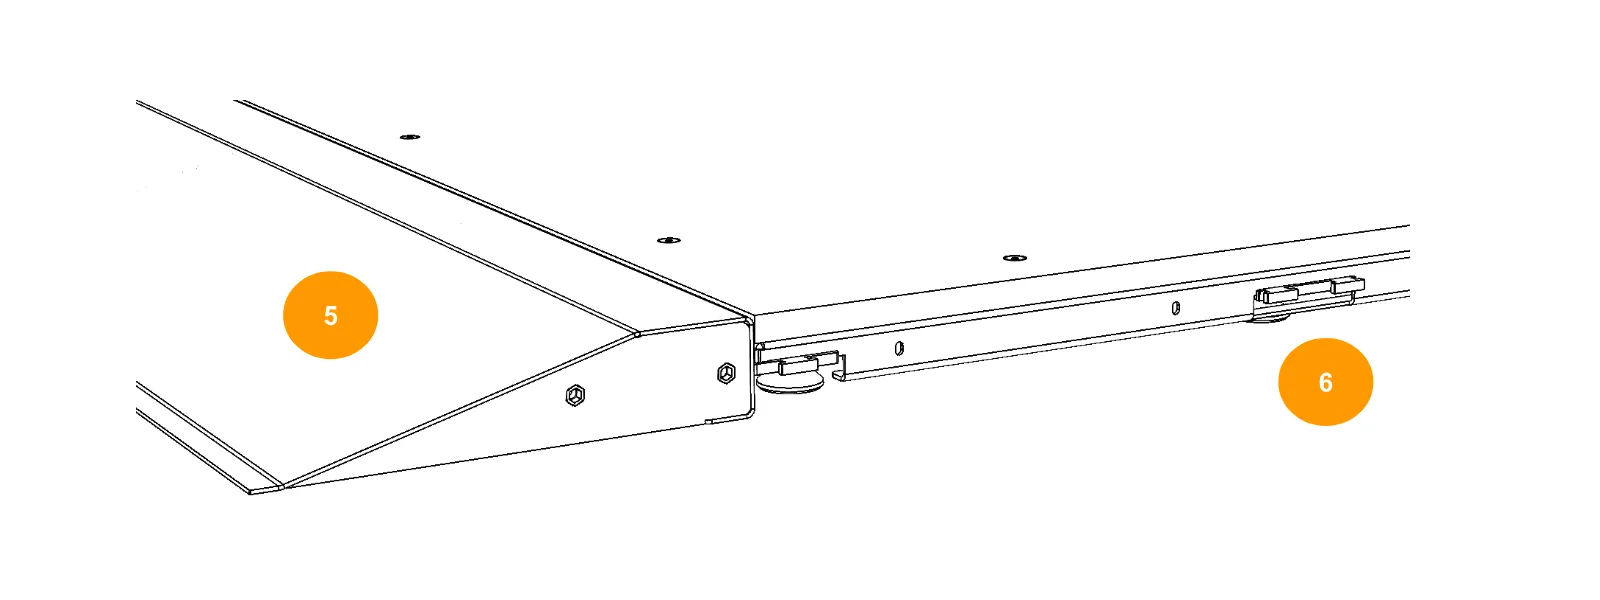
- Rampe de conducere (5)
- Fundal/puncte de conectare a cicloramei (6)
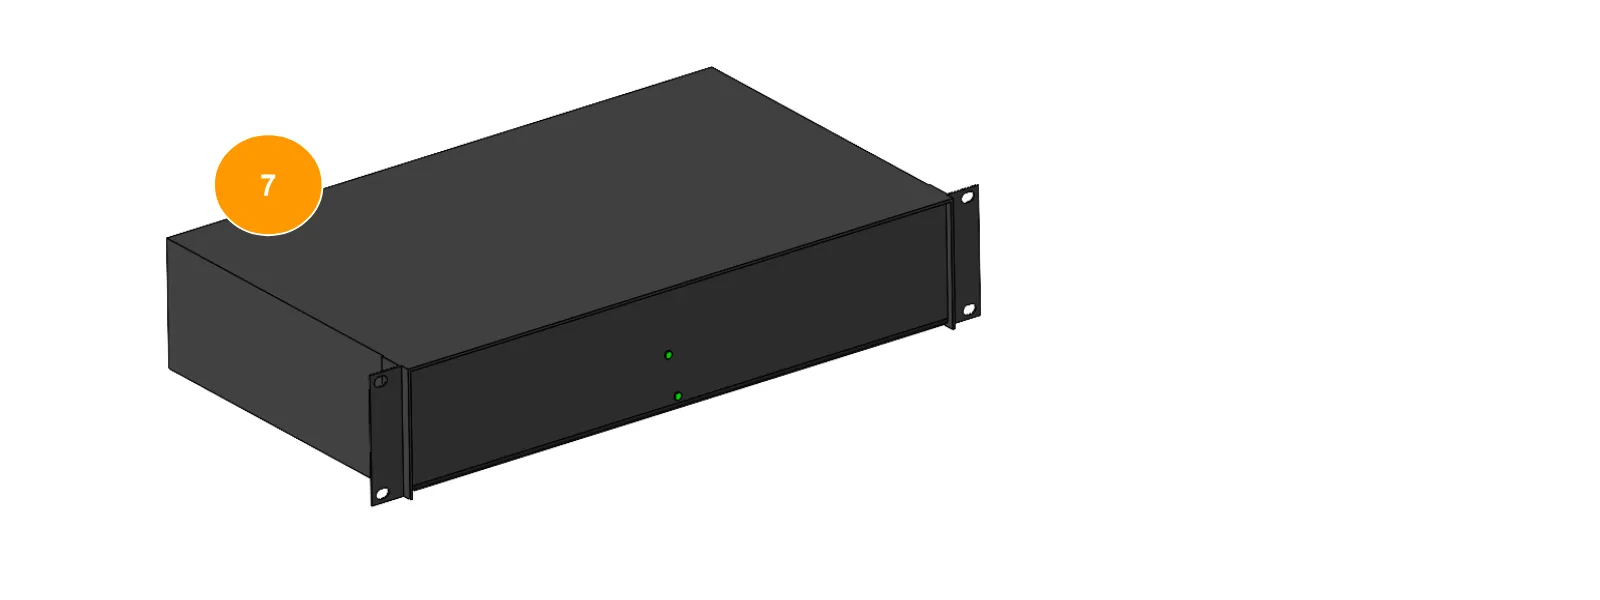
- Unitate de control rack de 19 inchi (7)
Notă: Rack-ul de 19 inchi (7) găzduiește unitatea de control, care este instalată orizontal într-un spațiu ventilat pentru a asigura răcirea componentelor electronice.
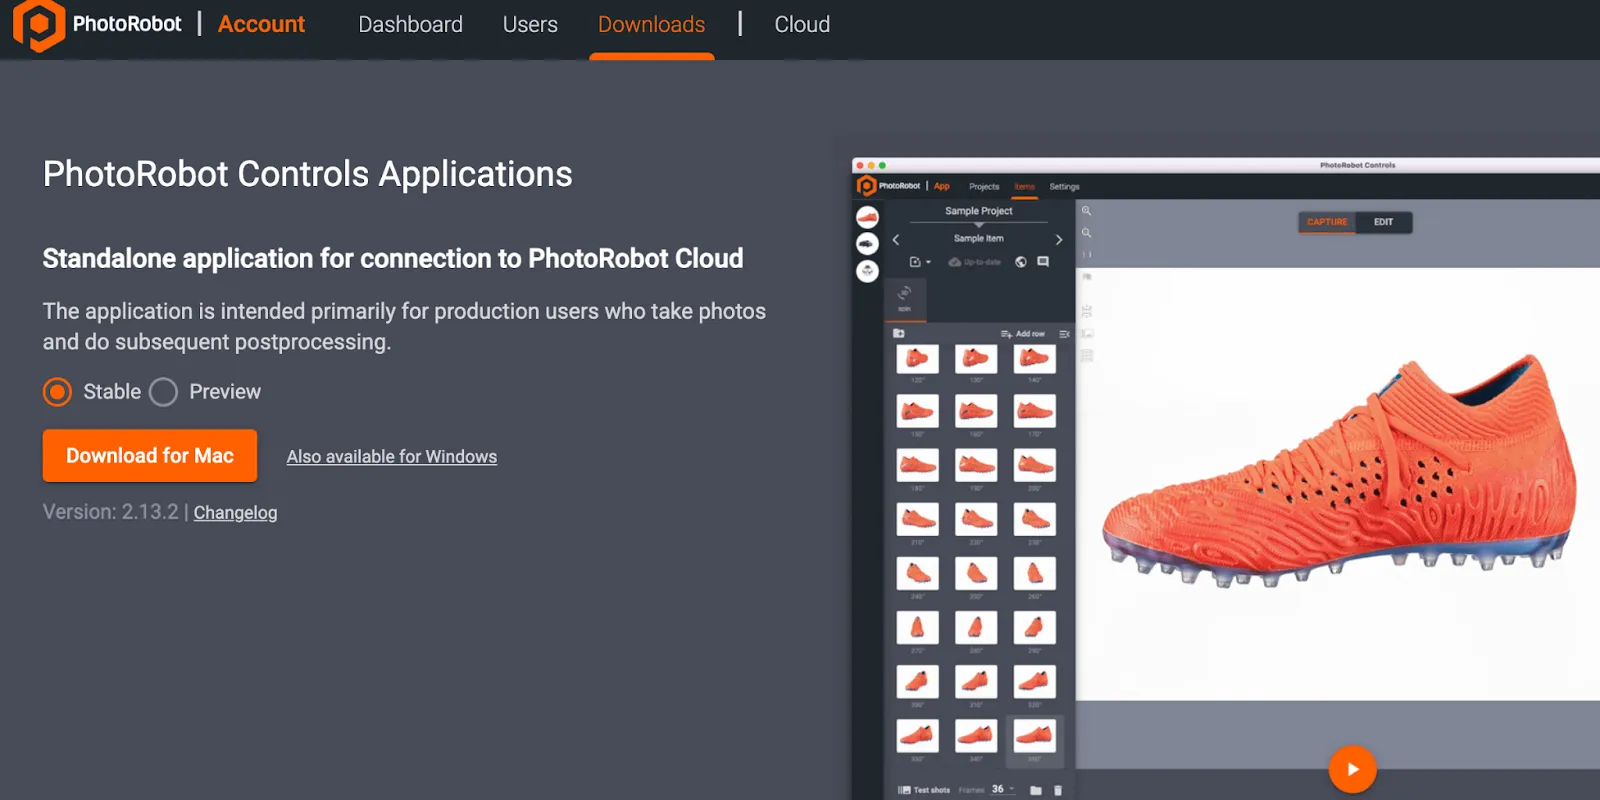
2. Prezentare generală a software-ului de control - Aplicația de control PhotoRobot
Controlul platformei și stației de lucru de fotografie ROBOTICĂ Carousel 3000 se realizează prin software-ul PhotoRobot Controls App (CAPP). CAPP integrează controlul roboților, camerelor, luminilor de studio și post-producției. Aceasta include funcții de gestionare a fluxului de lucru, precum și funcționalitatea necesară pentru o automatizare eficientă în post-procesare și publicarea conținutului.
Notă: Software-ul PhotoRobot Controls App nu este livrat cu dispozitivul; este o achiziție separată disponibilă pentru descărcare prin Contul PhotoRobot dumneavoastră.
Pentru asistență la instalare și începere, consultați PhotoRobot Controls App: Noțiuni introductive.
În plus, rețineți că software-ul poate porni în „modul expert” după instalarea CAPP. Modul expert este o interfață de utilizator simplificată care permite scanarea codurilor de bare pentru a identifica obiecte și a porni automat secvențe de captură. Pentru informații tehnice despre configurarea modului expert, consultați Configurarea modului expert al aplicației PhotoRobot Controls.
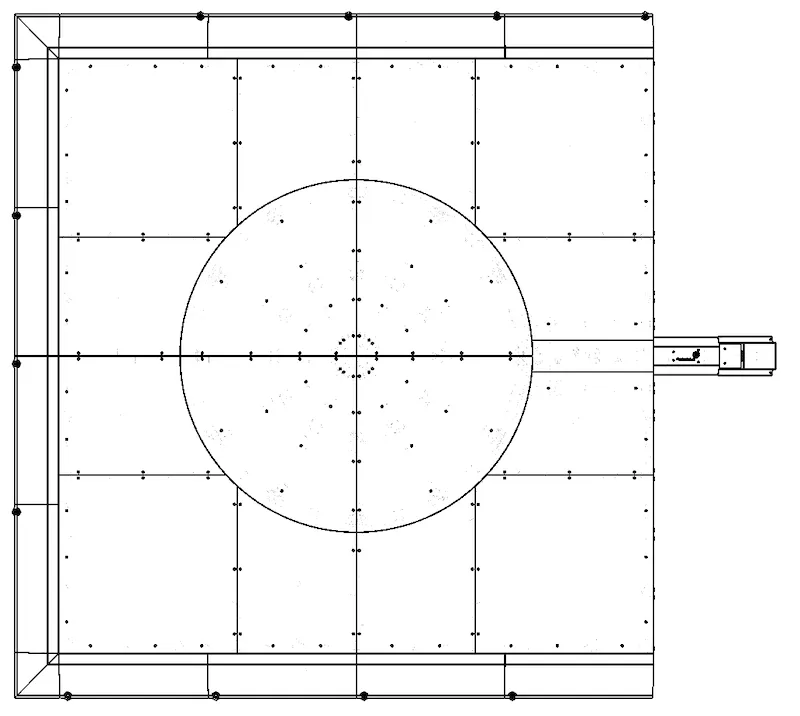
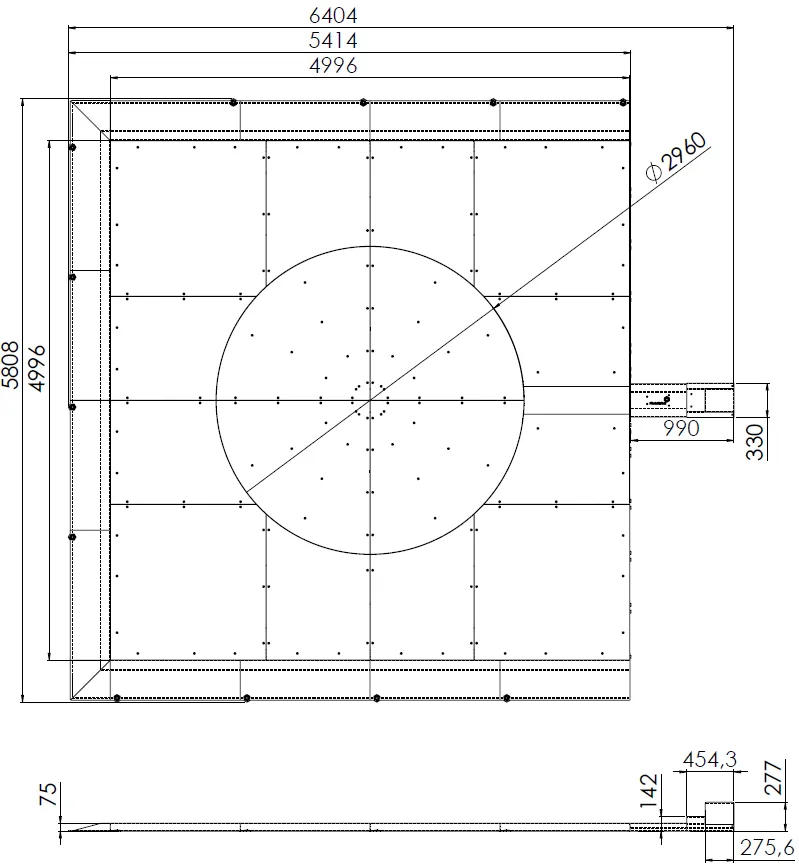
3. Dimensiuni mașină CAROUSEL 3000
Următoarele schițe tehnice ilustrează dimensiunile mașinii CAROUSEL 3000 în configurația pătrată.
4. Poziționarea Camerelor
Poziționarea camerei pentru PhotoRobot Carpet Studio este ilustrată în infograficul următor.
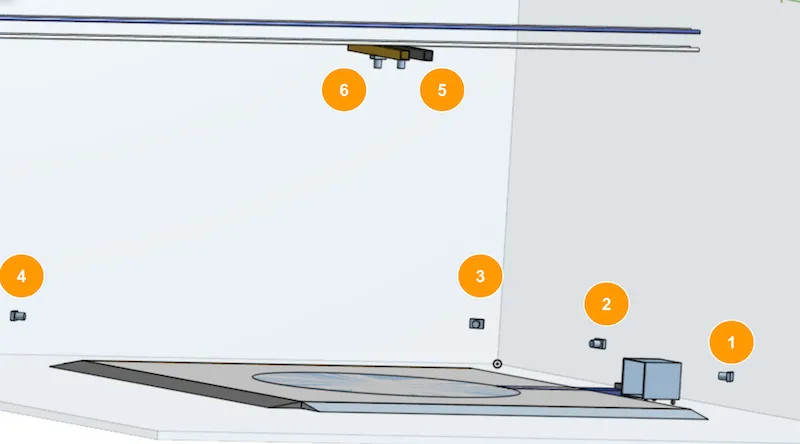
- Camerele 1 până la 4 sunt instalate de-a lungul laturilor PLATFORM-ei.
- Camerele 5 și 6 sunt instalate în structura superioară.
- Camera 7 (Canon EOS R6, neilustrată mai sus) este instalată în structura superioară, în priza de la capătul extensiei optice USB, atârnând la stânga sau la dreapta de structura superioară.
5. Instrucțiuni de operare
5.1. Pornirea Carpet Studio
5.1.1. Pentru a alimenta stația de lucru Carpet Studio, începeți prin a porni întrerupătorul principal de alimentare.
5.1.2. Apoi, porniți Unitatea de Control.
5.1.3. Porniți SynchroBox.
5.1.4. Porniți LaserBox-ul.
5.1.5. Porniți computerul stației de lucru.
5.1.6. Lansați software-ul PhotoRobot Controls App pe computer și accesați Setări, urmate de Spații de lucru, și selectați spațiul de lucru.
5.1.7. După selectarea unui spațiu de lucru în CAPP, porniți butonul numărul 1 de pe hub-ul USB și așteptați până când lumina Camerei 1 devine verde.
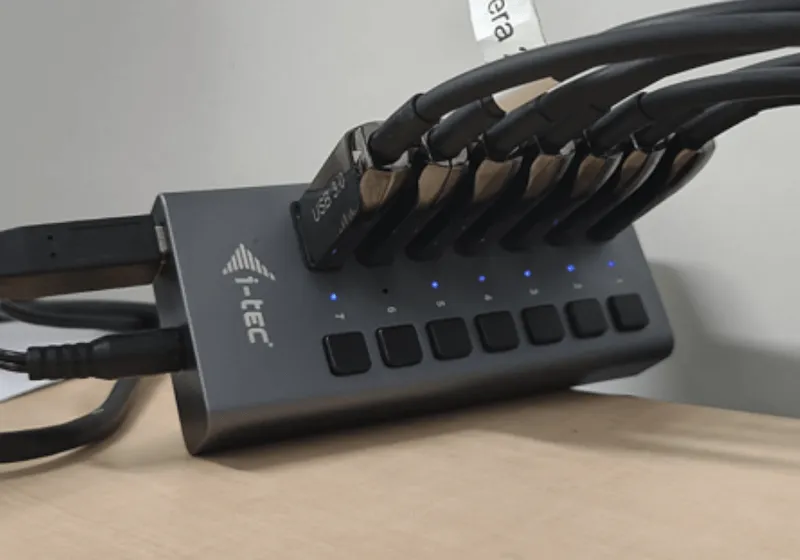
5.1.8. Porniți butonul numărul 2 de pe hub-ul USB și așteptați până când indicatorul luminos al Camerei 2 devine verde.
5.1.9. Repetați procesul pentru butonul numărul 3, butonul numărul 4 și butonul numărul 5 de pe hub-ul USB. Nu uitați să așteptați ca lumina camerei corespunzătoare să devină verde înainte de a porni următorul număr.
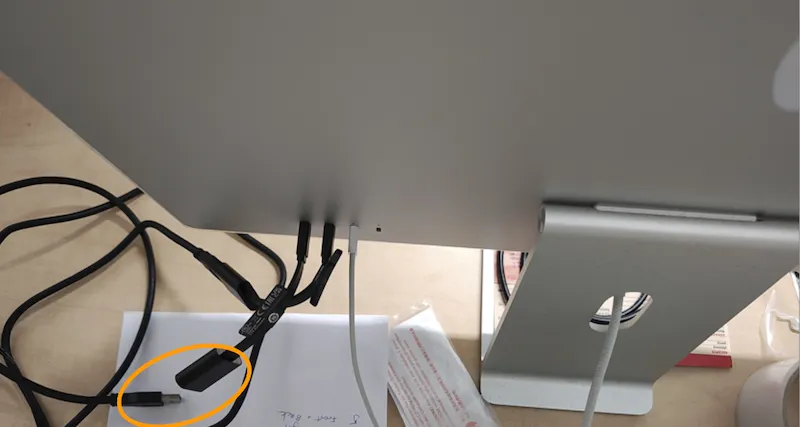
5.1.10. Conectați conectorul USB al camerei 6 (Canon EOS 5 DSR) în priza de la capătul extensiei optice USB și așteptați până când lumina camerei 6 devine verde.
5.1.11. După ce Camera 1 - 6 este conectată, începeți fotografierea de test.
5.1.12. Butoanele numărul 6 și 7 de pe hub-ul USB corespund Camerei 7. Conectați Camera 7 la butonul 6 sau la butonul 7, în funcție de poziția camerei. Acest lucru va depinde de faptul dacă este montată fizic la stânga sau la dreapta. Rețineți că ambele butoane 6 și 7 de pe hub-ul USB pot rămâne pornite continuu fără a provoca daune. În plus, Camera 7 este o cameră operată manual și ar trebui conectată prin extensia optică USB. Camera se pornește apoi folosind propriul buton de pornire/oprire, nu hub-ul USB – și ar trebui să o porniți doar atunci când o utilizați activ.
5.1.13. Începeți fotografierea de test cu Camera 7, și apoi opriți Camera 7 după ce este gata de utilizare.
5.2. Oprirea Carpet Studio
5.2.1. Pentru a opri Carpet Studio, începeți prin a opri Camera 7 folosind butonul de alimentare de pe corpul camerei.
5.2.2. Apoi, deconectați conectorul USB al camerei 6 (Canon EOS 5 DSR) de la priza de la capătul extensiei optice USB.
5.2.3. În ordine, opriți butoanele numărul 5, urmat de 4, apoi 3, 2 și 1 de pe hub-ul USB.
5.2.4. Închideți software-ul PhotoRobot Controls App pe computerul stației de lucru.
5.2.5. Opriți computerul stației de lucru.
5.2.6. Opriți LaserBox.
5.2.7. Opriți SynchroBox.
5.2.8. Opriți Unitatea de Control.
5.2.9. Opriți întrerupătorul principal de alimentare.
Notă: Dacă întâmpinați probleme în timpul funcționării mașinii, vă rugăm să trimiteți un tichet de asistență prin https://support.photorobot.com.
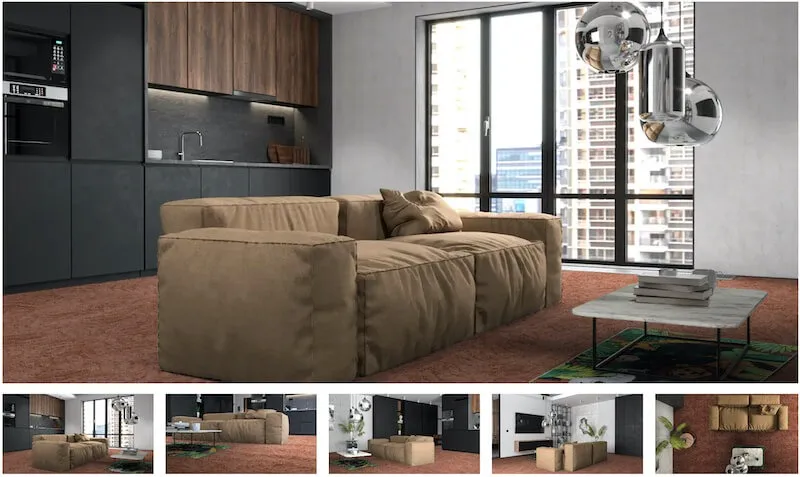
PhotoRobot Viewer: Vizualizator de covoare și pardoseli
Dezvoltat cu Jakub Klaus de la Breno Carpets, Carpet & Flooring Visualizer este o soluție personalizată PhotoRobot Product Viewer. Acesta permite prezentarea digitală a covoarelor și mochetelor într-un spațiu virtual. Vizualizatorii pot schimba între diferite modele și culori și pot poziționa produsele în jurul camerei în diferite locuri de pe podea. Există o navigare cu miniaturi pentru a schimba vizualizarea interioară, cu butoane pentru a comuta între produse sau pentru a încărca o rotație de 360 de grade (360 SPIN). Vizualizatorul permite, de asemenea, configurarea pardoselii, permițând consumatorilor să combine și să asorteze articole cu diferite designuri interioare.
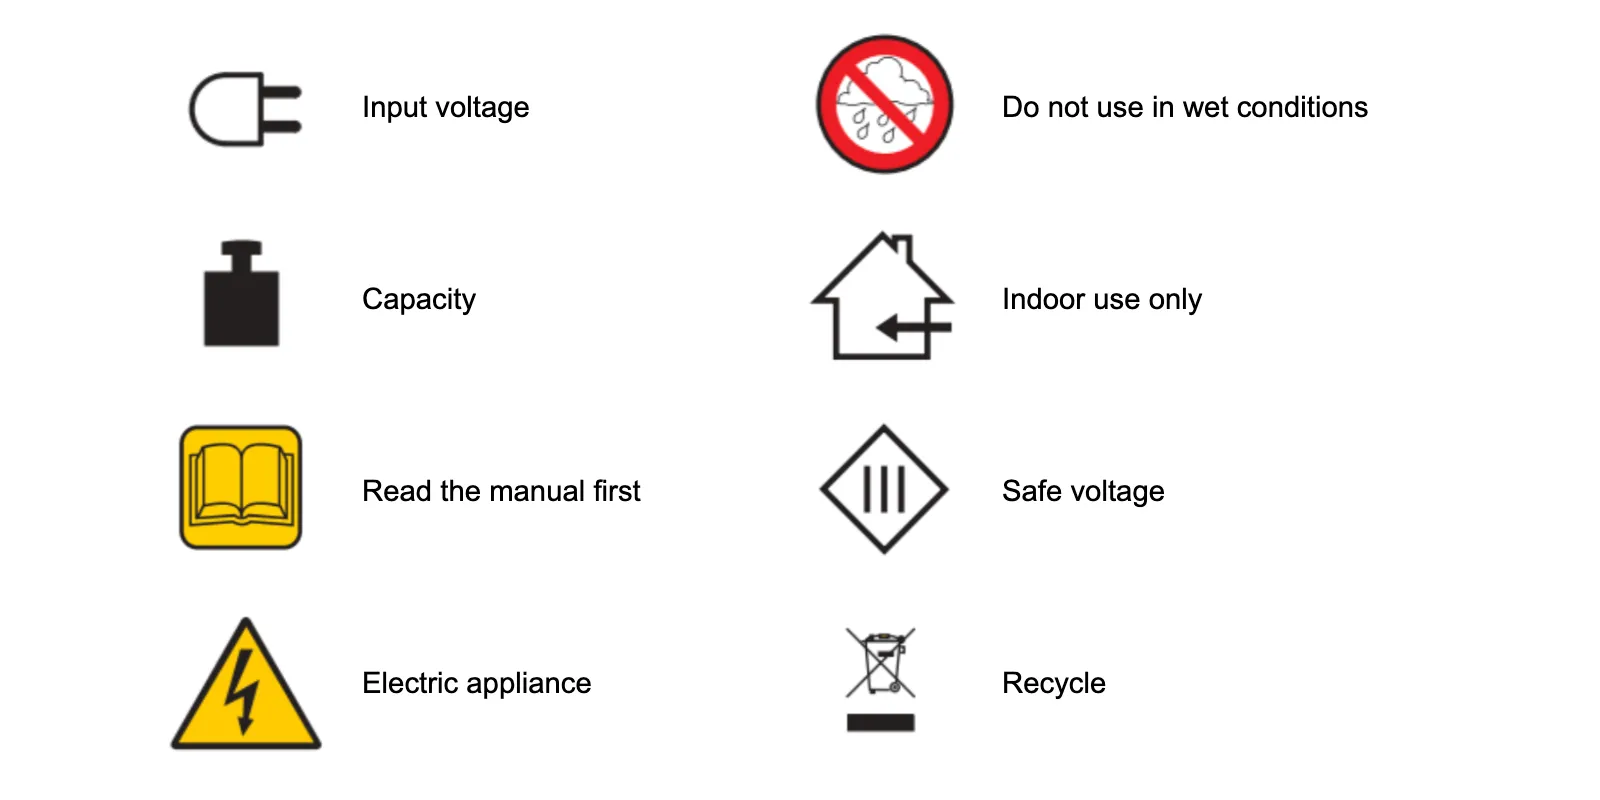
6. Etichete informative
6.1. Prezentare generală a simbolurilor
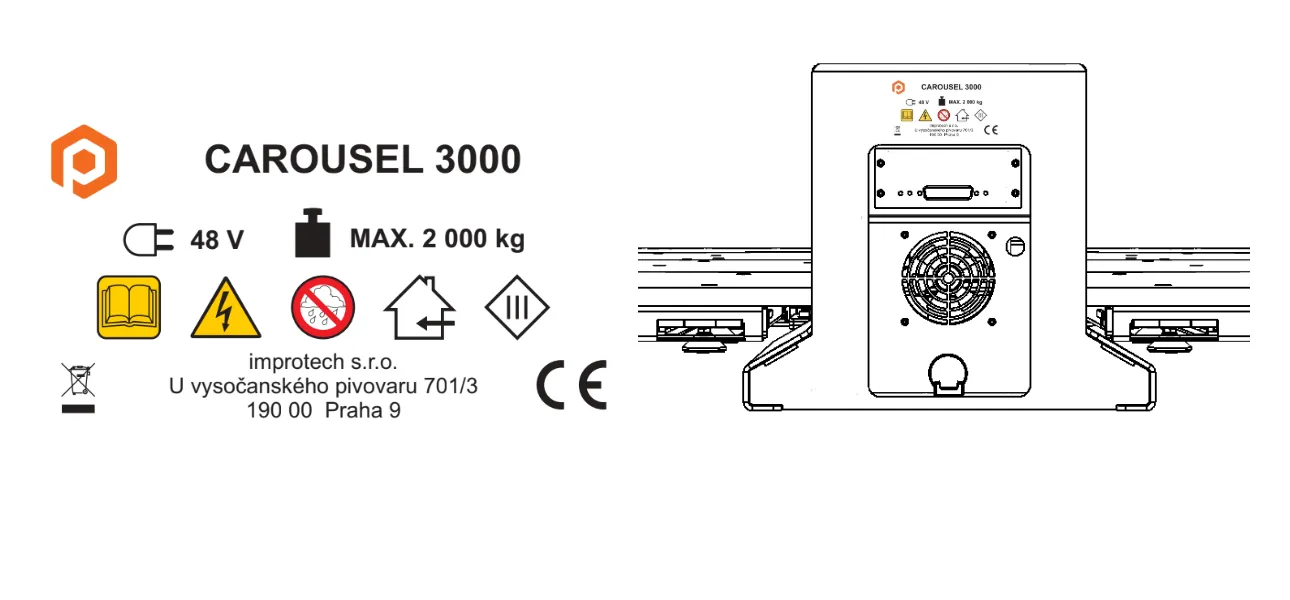
6.2. Etichete de informații CAROUSEL 3000
7. Întreținere și revizuire
PhotoRobot Carpet Studio trebuie inspectat o dată pe an de către personal autorizat, după cum urmează:
- Inspecția acționării platformei rotative
- Retensionarea și revizuirea lanțului de angrenaje (inclusiv roțile dințate)
- Inspecția angrenajului principal al platformei
- Inspecția curelei de indexare (dacă este inclusă)
- Inspecția podelei mașinii și a suportului acesteia
- Test de funcționare a comutatorului de siguranță al capacului motorului
- Actualizări de firmware (plătite sau gratuite, în funcție de contractul de asistență)


Seria EOS Rebel


Seria EOS DSLR


Seria EOS M Mirrorless


Seria PowerShot


Prim-plan / Portabil

Seria Canon EOS Rebel oferă aparate foto DSLR prietenoase pentru începători, cu o calitate solidă a imaginii, comenzi intuitive și funcții versatile. Ideale pentru pasionații de fotografie, aceste camere oferă focalizare automată fiabilă, ecrane tactile cu unghi variabil și înregistrare video Full HD sau 4K.
Conexiune
Rezoluție (MP)
Rezoluție
Seria Canon EOS DSLR oferă imagini de înaltă calitate, focalizare automată rapidă și versatilitate, ceea ce îl face ideal atât pentru fotografii, cât și pentru producția video.
Conexiune
Rezoluție (MP)
Rezoluție
Seria Canon EOS M Mirrorless combină designul compact cu performanța DSLR. Dispunând de obiective interschimbabile, focalizare automată rapidă și senzori de imagine de înaltă calitate, aceste camere sunt excelente pentru călători și creatorii de conținut care caută portabilitate fără a sacrifica calitatea imaginii.
Conexiune
Rezoluție (MP)
Rezoluție
Seria Canon PowerShot oferă aparate foto compacte și ușor de utilizat pentru fotografii ocazionali și pasionați. Cu modele care variază de la simple camere cu zoom până la camere cu zoom avansat, acestea oferă confort, calitate solidă a imaginii și funcții precum stabilizarea imaginii și video 4K.
Conexiune
Rezoluție (MP)
Rezoluție
Camerele Canon Close-Up și portabile sunt concepute pentru fotografii și videoclipuri detaliate, de aproape. Compacte și ușor de utilizat, acestea oferă focalizare precisă, imagini de înaltă rezoluție și capabilități macro versatile - perfecte pentru vlogging, fotografii de produse și prim-planuri creative.


